
A solar charge controller is the device that sits between your solar panels and your battery and decides how much power the battery is allowed to take. Without it, a panel in full sun would push the battery past its safe voltage, boil off the electrolyte, and shorten its life to months. With it, the battery charges at the right voltage, in the right stages, and the system lasts for years.
In this guide, we explain what a solar charge controller does, how MPPT and PWM controllers work, the three charging stages every battery goes through, and how to size a controller for your system — with a worked example you can follow before you buy anything.
What Is a Solar Charge Controller?
A solar charge controller is an electronic device that regulates the voltage and current flowing from the solar panels into the battery bank. It has one job: charge the battery as fast as is safe, and never overcharge it. It also stops the battery from discharging back into the panels at night, and it protects the battery from deep discharge when the load draws too much.
Every solar system with a battery needs one. A small cabin system uses a 10 A controller the size of a paperback; a house with a 3 kW array uses a 60 A MPPT controller the size of a shoebox. The controller is cheap compared to the battery it protects, and it is the part most often blamed when a system underperforms — usually because it was sized wrong, or because a PWM controller was fitted where an MPPT one was needed. If you are new to solar, start with how solar panels work so the voltages in this guide make sense.
How a Solar Charge Controller Works
The controller watches two numbers all the time: the voltage of the panels and the voltage of the battery. In the morning the panel voltage rises above the battery voltage, and the controller starts charging. As the sun climbs, it lets more current through; as the battery fills, it tapers the current off so the voltage never exceeds the safe limit for that battery chemistry.
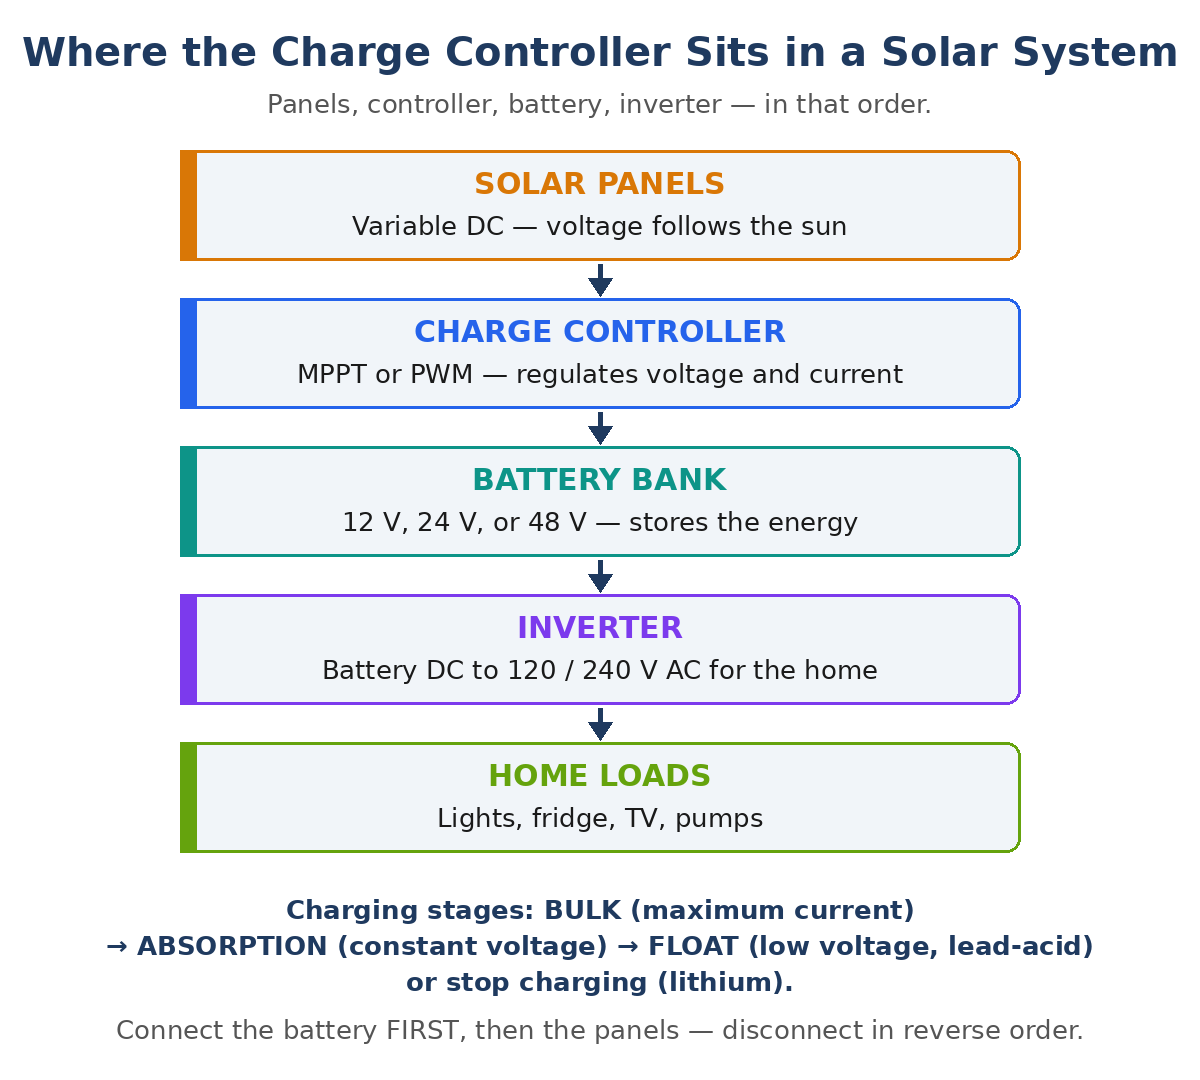
The diagram shows the flow: panels feed the controller, the controller feeds the battery, and the inverter draws from the battery to power the home. The loads can also connect to the controller’s load terminals on small systems, so the controller can cut them off if the battery runs too low. The difference between the two controller types is what happens inside that middle box, and it is worth understanding before you choose. The short version of the choice is MPPT vs PWM: MPPT is the efficient one, PWM is the cheap one.
MPPT vs PWM: The Power Difference
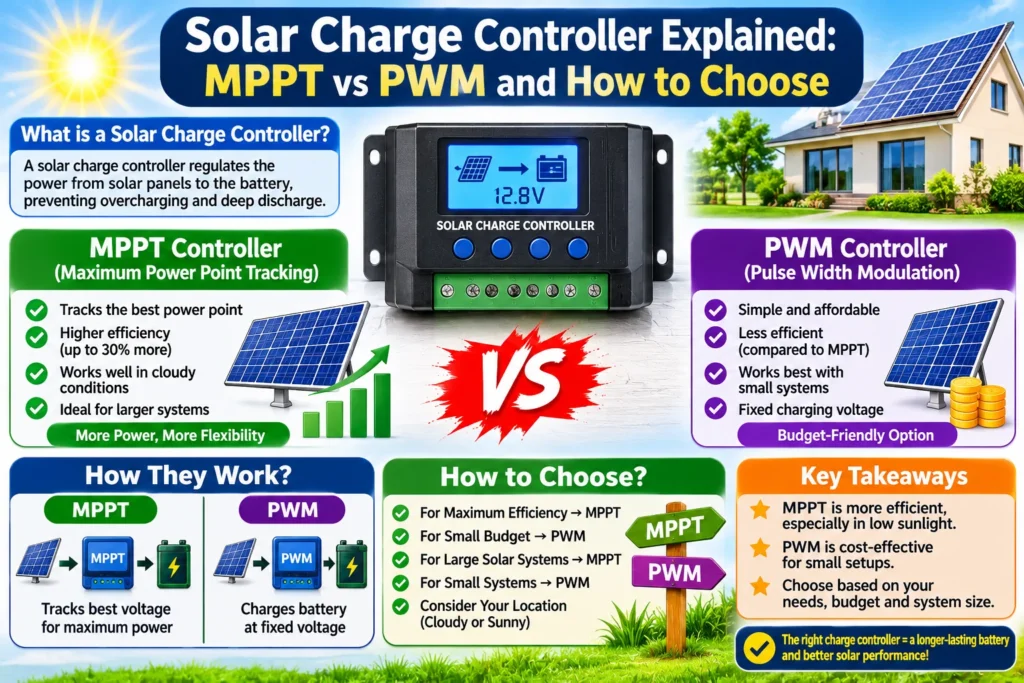
A PWM (pulse width modulation) controller connects the panel almost directly to the battery and switches the connection on and off hundreds of times a second to hold the average voltage at the battery’s level. The problem is that the panel is dragged down to the battery voltage — a 17 V panel on a 12 V battery gives up a third of its power. An MPPT (maximum power point tracking) controller is a DC-DC converter: it takes the panel’s full voltage and current, finds the point where the panel produces the most power, and converts the extra voltage into extra charging current.
- MPPT: tracks the panel’s maximum power point and converts the extra voltage into current. It harvests 20–30% more energy than PWM from the same panels, and it lets you use higher-voltage panels on a low-voltage battery.
- PWM: simple and cheap. It is fine for a small system where the panel voltage is close to the battery voltage — for example, a 12 V panel on a 12 V battery — but it wastes power whenever the voltages do not match.
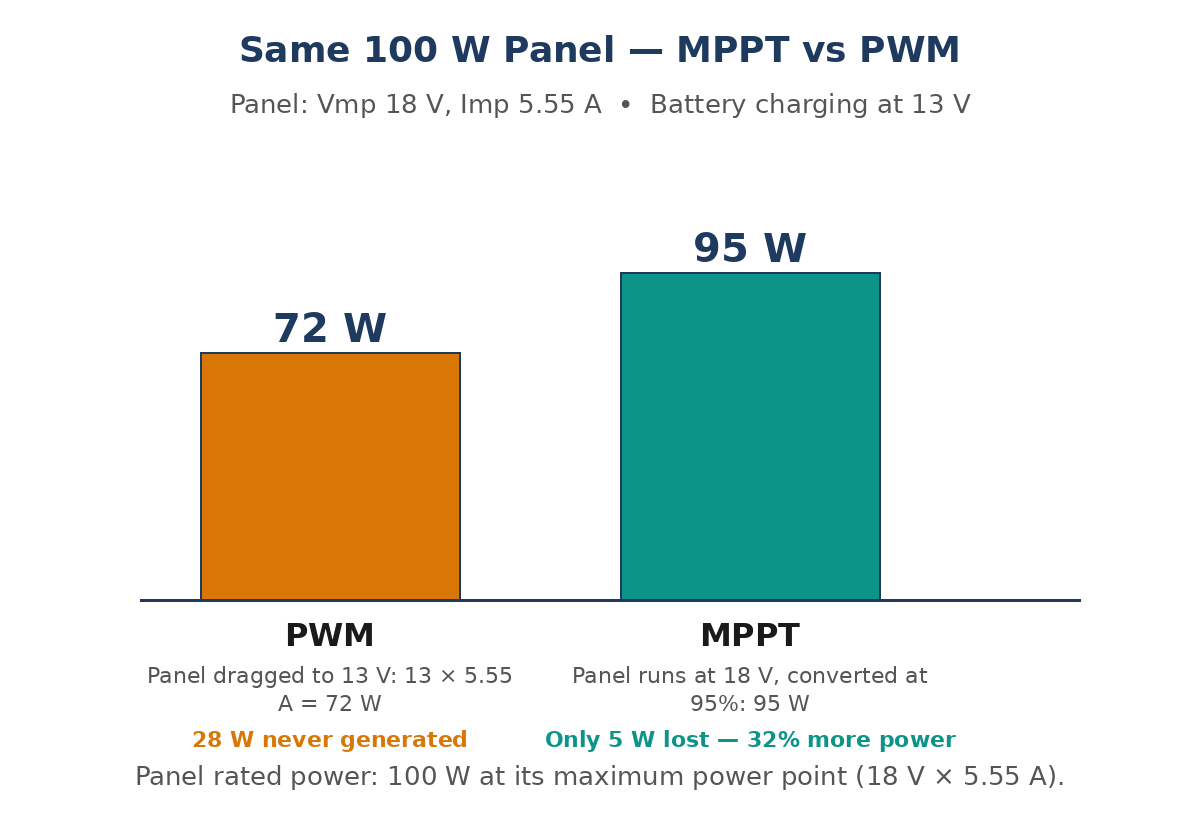
The chart shows the same 100 W panel charging a 12 V battery. With PWM, the panel is pulled down to the battery’s 13 V, so it delivers only about 72 W. With MPPT, the panel stays near its 17 V maximum power point and the controller converts the extra voltage into current, delivering about 95 W. That 32% gap is why an MPPT controller pays for itself on any system bigger than a trickle charger.
The Three Charging Stages
A good controller does not just push current into the battery until it is full. It charges in three stages, each with its own voltage and current, because that is what a battery needs to last.
- Bulk: the controller delivers as much current as the panels can give, and the battery voltage climbs steadily. This is the fastest stage, and it covers roughly the first 80% of the charge.
- Absorption: once the battery reaches its absorption voltage (about 14.4 V for a 12 V lead-acid battery), the controller holds the voltage steady and lets the current taper off. This stage tops the battery up gently and takes the longest.
- Float: when the battery is full, the controller drops to a lower float voltage (about 13.6 V) and supplies just enough current to cover self-discharge and small loads. The battery can sit at float indefinitely without damage.
The voltages above are for lead-acid batteries. Lithium batteries use different setpoints — a 12 V lithium battery absorbs at about 14.2–14.6 V and has no float stage, or a very short one — and the controller must be set to the right chemistry, or the battery will be undercharged or overcharged. Different battery types need different charging profiles, so check the battery datasheet before you set the controller.
How to Size a Solar Charge Controller: Worked Example
Sizing a controller is a current calculation: the controller must handle the maximum current the panels can produce, with a safety margin for cold, bright days when panels exceed their rated output.
Take a 600 W array on a 24 V battery bank. The current is power divided by voltage: 600 ÷ 24 = 25 A. Panels can exceed their rated output by about 25% on a cold, clear morning, so multiply by 1.25: 25 × 1.25 ≈ 31 A. The controller must be rated for at least 31 A, so the next standard size up is 40 A.
- Current (A) = array power (W) ÷ battery voltage (V) × 1.25 safety factor
On a 12 V bank the same 600 W array needs 600 ÷ 12 × 1.25 ≈ 62 A, so a 60 A controller would be marginal and an 80 A unit is the safer pick. On a 48 V bank it needs only about 16 A, so a 20 A controller is enough. The higher the battery voltage, the smaller the controller — one more reason larger systems use 24 V or 48 V banks.
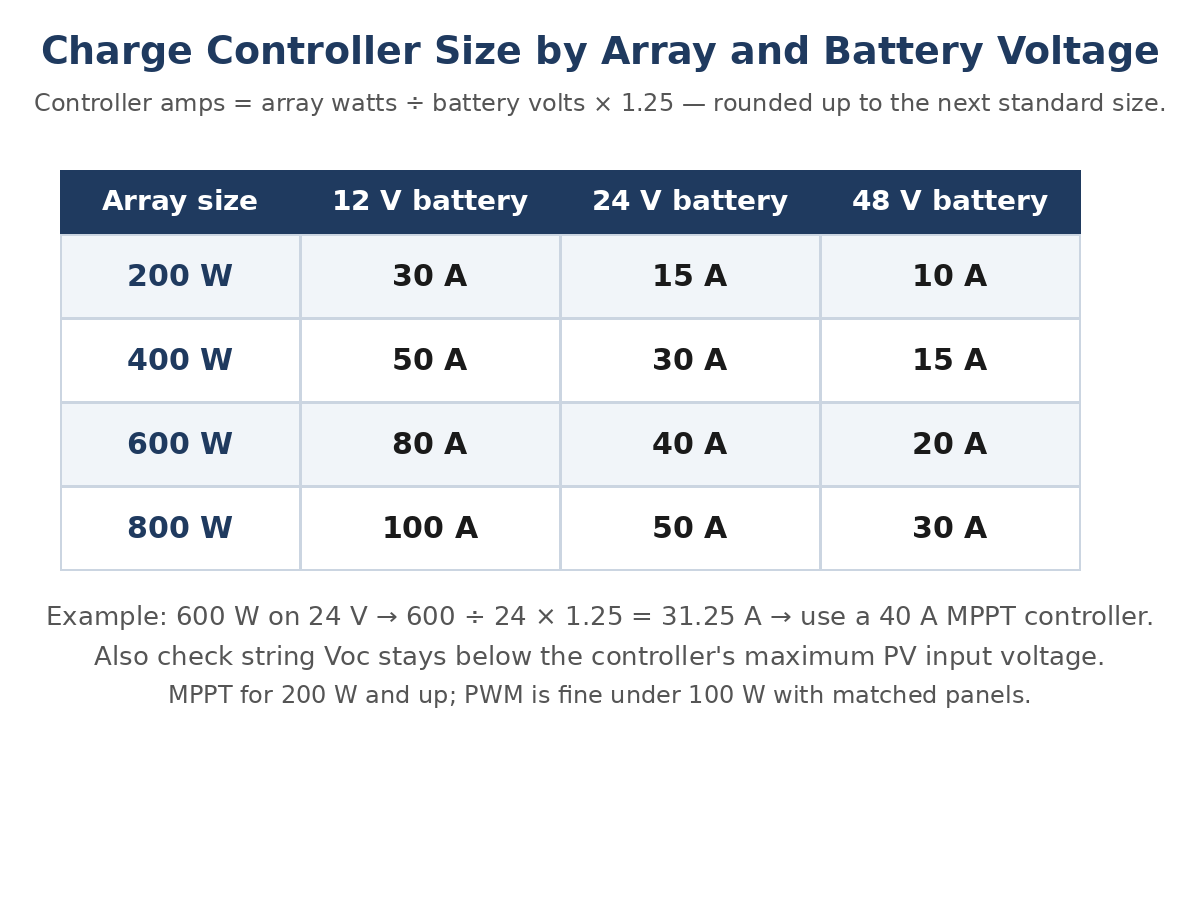
The table shows the controller size for common arrays. The worked example is the 600 W row: 62 A on 12 V, 31 A on 24 V, 16 A on 48 V. Always round up to the next standard size, and remember that the array’s open-circuit voltage must also be under the controller’s maximum input voltage — a 150 V controller can take three 45 V panels in series, but not four. Getting the panels onto the roof in the right arrangement is part of solar panel wiring, and the series-parallel choice changes the voltage the controller sees.
Choosing MPPT or PWM
| Feature | MPPT | PWM |
| Efficiency | 95–99% | 70–80% |
| Cost | Higher | Lower |
| Best for | Systems over 200 W, or panels above battery voltage | Small systems under 200 W, panel voltage near battery voltage |
| Panel voltage | Can be much higher than the battery | Must be close to the battery voltage |
| Cold weather gain | Large — panels make more voltage when cold | None — the extra voltage is wasted |
| Display and data | Usually has a display, Bluetooth, and history | Basic LEDs, sometimes a small display |
The rule is simple: if the array is bigger than about 200 W, or if the panel voltage is much higher than the battery voltage, buy MPPT. The extra energy it harvests pays for the price difference within a year or two on a daily-use system. PWM still makes sense for a tiny system — a 50 W panel keeping a gate battery topped up, for example — where the panel voltage already matches the battery and there is no extra power to harvest.
Installation and Wiring Basics
- Connect the battery first. The controller needs to sense the battery voltage to set itself to 12 V, 24 V, or 48 V. Connecting the panels first can damage it.
- Fuse the battery side. Put a fuse or breaker on the positive wire between the battery and the controller, sized just above the controller’s rating.
- Keep the wires short and thick. Voltage drop between the controller and the battery wastes power and confuses the charging stages. Use the wire size the manual recommends for your current and distance.
- Give it air. Controllers get warm, especially MPPT units at full power. Mount it vertically on a non-flammable surface with clear air above and below.
- Set the battery type. Select lead-acid, AGM, gel, or lithium in the controller’s menu before the first charge, and check the absorption and float voltages against the battery datasheet.
Common Mistakes to Avoid
- Oversizing the array beyond the controller’s input. A 40 A controller on a 12 V battery can take about 520 W of panels; more than that is wasted, and some controllers will fault or shut down.
- Mixing panel voltages in parallel. Panels in parallel must have the same voltage, or the lower-voltage panel drags the others down.
- Ignoring the open-circuit voltage in the cold. A panel’s voltage rises as it gets colder, so an array that is safe at 25 °C can exceed the controller’s limit on a frosty morning.
- Using a PWM controller with high-voltage panels. A 36 V panel on a 12 V battery through a PWM controller wastes two-thirds of the panel’s power.
- Forgetting the load terminals’ limit. The controller’s load output is usually rated for only 10–30 A; a heavy load like an inverter must connect directly to the battery, not through the controller.
Frequently Asked Questions
Do I need a charge controller for a small solar panel?
If the panel is under about 5 W and the battery is large, you can often skip it — the panel cannot overcharge the battery. For anything bigger, use a controller: even a 20 W panel will overcharge a small battery on a sunny day.
Can I use a 24 V panel on a 12 V battery?
Yes, with an MPPT controller: it converts the panel’s higher voltage down to the battery voltage and turns the extra voltage into charging current. With a PWM controller the panel is dragged to the battery voltage and most of the power is wasted.
What happens if the charge controller is too small?
The controller will limit the current to its rating and waste the rest of the panel’s output, so the battery charges slowly. Some controllers overheat and shut down, and a few will be damaged. Always size the controller at least 25% above the array’s maximum current.
Can I connect two charge controllers to one battery?
Yes. Two controllers can charge the same battery bank, as long as both are set to the same battery type and voltages. This is common when two separate arrays face different directions and each has its own controller.
Does a charge controller work at night?
It stays on, but it does almost nothing: with no sun, there is no power to control. A good controller draws only a few milliamps from the battery overnight, and it blocks the battery from discharging back through the panels.
Conclusion
A solar charge controller is a small box with a big job: it turns raw panel power into a safe, staged charge that keeps the battery alive for years. Choose MPPT for any system over about 200 W, size the controller at least 25% above the array’s maximum current, set the battery type before the first charge, and connect the battery first. Get those four things right and the rest of the system will take care of itself. For a deeper comparison of the two controller types, read MPPT vs PWM Charge Controller: Which Do You Need? on The Green Watt.