Imagine a newly constructed house where electricians need to install a temporary electrical connection for lighting and tools during construction. Instead of installing expensive concealed wiring immediately, electricians often use a simple and quick wiring method to supply electricity safely. One of the most commonly used methods for temporary electrical installations is the Cleat Wiring System in Houses.
Cleat wiring is one of the oldest and simplest electrical wiring methods. It is still used in certain situations where quick installation, low cost, and easy removal are required. Although modern buildings mainly use concealed wiring systems, understanding cleat wiring is still very important for electrical students, engineers, and technicians.
This topic is especially important for beginners learning electrical wiring systems. It helps them understand how early electrical installations were designed and how temporary wiring systems work.
In this detailed guide, you will learn:
- What a Cleat Wiring System in Houses is
- Cleat wiring working principle
- Types of cleat wiring systems
- Main components used in the system
- Cleat wiring advantages and disadvantages
- Practical applications of cleat wiring
- Differences between cleat wiring and other wiring systems
- Common problems and troubleshooting methods
This article explains the topic in simple and clear language so that beginners can easily understand it.
Cleat Wiring
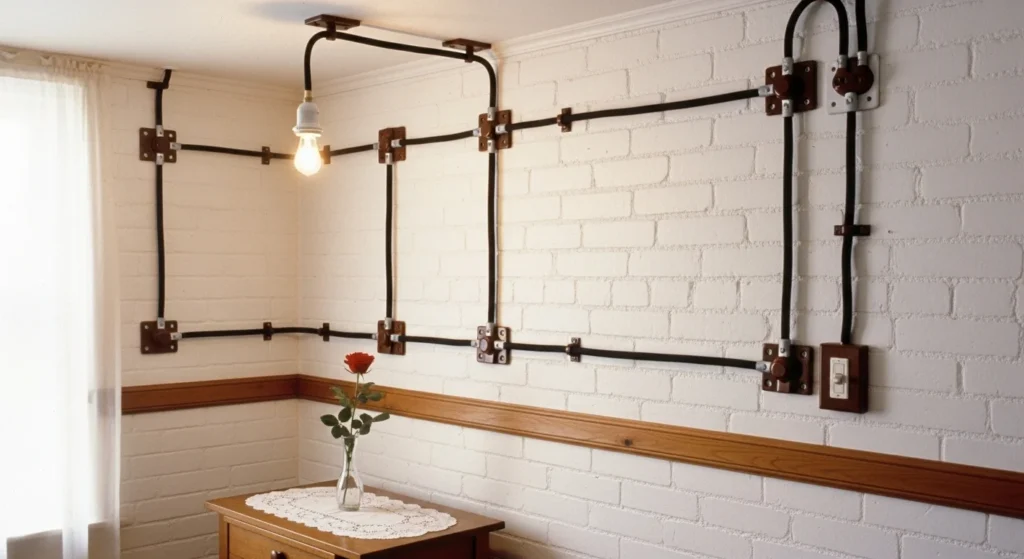
Cleat wiring is one of the simplest and oldest types of electrical wiring systems used in electrical installations. In this method, insulated wires are supported on walls or ceilings using special fittings called cleats. These cleats are usually made of porcelain, plastic, or wood and are fixed to the surface with screws. The wires are placed between the grooves of the cleats and are held tightly in position.
Cleat wiring is mainly used for temporary electrical installations where the wiring is required for a short period of time. It is commonly seen at construction sites, temporary workshops, exhibitions, festivals, and testing laboratories. Because the wiring is exposed and easy to install, electricians can quickly set up and remove the wiring when needed.
This wiring system is popular for temporary use because it requires very few materials and the installation process is very quick. The wires remain visible, which makes inspection and fault detection easy. If a wire becomes damaged, it can be replaced without difficulty.
However, cleat wiring is not suitable for permanent electrical installations because the wires are exposed and have little protection from weather, moisture, or mechanical damage. For permanent wiring in buildings, systems such as conduit wiring or concealed wiring are preferred.
Despite its limitations, cleat wiring remains an important basic wiring method that electrical students and technicians learn when studying electrical installation techniques.
Details of Cleat Wiring
Cleat wiring works by supporting insulated electrical wires on surfaces using cleats placed at regular distances. The cleats hold the wires firmly and maintain the proper spacing between them.
Structure of Cleats
Cleats are designed in two parts:
1. Base Part
The base part of the cleat is fixed to the wall or ceiling using screws.
2. Cap Part
The cap part is placed over the wires and tightened with screws to hold the wires firmly between the grooves.
This two-piece design ensures that the wires remain secure and properly aligned.
Installation Process
The installation of cleat wiring generally follows these steps:
- The positions for the cleats are marked on the wall or ceiling.
- The base part of each cleat is fixed using screws.
- Insulated wires are placed in the grooves of the base cleats.
- The cap part of the cleats is placed over the wires and tightened.
- The wires are connected to switches, sockets, and electrical appliances.
Cleats are usually placed at regular intervals so that the wires remain properly supported.
Features of Cleat Wiring
Cleat wiring has several noticeable characteristics:
- Very simple wiring method
- Low installation cost
- Quick installation and removal
- Easy inspection and maintenance
- Wires remain fully visible
These features make it suitable for short-term electrical installations.
Limitations of Cleat Wiring
Cleat wiring also has several disadvantages:
- Not suitable for permanent installations
- Wires are exposed and may be damaged
- Poor protection from moisture and dust
- Appearance is not attractive for modern buildings
- Risk of mechanical damage
Because of these limitations, it is mainly used only for temporary purposes.
Applications
Cleat wiring is commonly used in situations where temporary electrical connections are required.
Examples include:
- Construction sites
- Temporary workshops
- Exhibition halls
- Festival lighting
- Testing laboratories
- Outdoor temporary lighting systems
Cleat wiring is a simple and economical electrical wiring system where insulated wires are supported by cleats fixed on walls or ceilings. It is mainly used for temporary installations because it is quick to install and easy to remove.
Although it does not provide strong protection and is not suitable for permanent use, cleat wiring remains an important method in electrical training and temporary electrical setups. Understanding this wiring system helps electrical students and technicians learn the basics of electrical installation and wiring management.
The Cleat Wiring System in Houses is a temporary wiring method in which insulated electrical wires are supported and held in place using porcelain or plastic cleats fixed to walls or ceilings.
Simple Definition
Cleat wiring is a type of open wiring system where wires are run along walls or ceilings and held by special cleat supports.
Simple Explanation
In this system, insulated wires are not hidden inside walls or conduits. Instead, they are placed openly and supported at regular intervals by cleats.
Each cleat consists of two parts:
- A base cleat fixed to the wall
- A cap cleat that holds the wire firmly
This design keeps the wires properly separated and prevents them from touching the wall surface.
Practical Example
Cleat wiring is commonly used:
- At construction sites
- In temporary houses
- During exhibitions or events
- In workshops for temporary connections
Because it is simple and low-cost, electricians can install or remove it quickly.
3. Cleat Wiring Working Principle
The cleat wiring working principle is based on safely supporting electrical conductors using insulating cleats to maintain proper spacing and prevent electrical hazards.
Step-by-Step Working Process
- Power Supply Connection
- Electricity comes from the main distribution board.
- Wire Installation
- Insulated wires are stretched along the wall or ceiling.
- Cleat Fixing
- Porcelain cleats are fixed to the surface using screws.
- Wire Support
- Wires are placed inside the base of the cleat.
- Cap Tightening
- The cap of the cleat is placed on top and tightened.
- Current Flow
- Electric current flows through the wires to supply power to loads.
Simple Analogy
Think of cleat wiring like holding a rope along a wall using small clips. The clips keep the rope straight and prevent it from falling.
Similarly, cleats hold the electrical wires in position and keep them separated for safety.
Important Design Feature
The spacing between cleats is usually 40–60 cm to ensure the wires remain properly supported.
4. Types / Classification of Cleat Wiring
There are mainly two types of cleat wiring systems based on the number of conductors supported.
4.1 Single Cleat Wiring
Single cleat wiring supports only one wire.
Features
- One conductor per cleat
- Used for simple circuits
- Suitable for low power loads
Typical Use
- Small lighting circuits
- Temporary installations
4.2 Double Cleat Wiring
Double cleat wiring supports two wires simultaneously.
Features
- Supports both phase and neutral wires
- Provides better wire alignment
- Most common type of cleat wiring
Typical Use
- Domestic temporary wiring
- Construction site power supply
4.3 Multi-Wire Cleat Wiring
In some installations, cleats support multiple conductors.
Features
- Supports more than two wires
- Used in larger temporary systems
Typical Use
- Workshops
- Temporary distribution networks
5. Main Components of Cleat Wiring System
The cleat wiring system uses several basic components.
1. Cleats
In electrical wiring, cleats are small but essential hardware fittings used to securely support and guide wires or cables. They are typically made of iron, steel, or plastic and are mounted on walls, ceilings, or wooden surfaces using screws or anchors. Cleats prevent wires from sagging, keep the wiring routes organized, and protect the wires from damage due to weight or tension. In both industrial and residential installations, cleats come in various sizes and shapes to provide proper support for wires or cables of different diameters. They are especially useful when wires need to run long distances or around corners, as cleats help maintain the wires in place and ensure safety. Additionally, cleats make installation maintenance easier, as the wiring remains neat, organized, and easily accessible.
Types of Cleats
- Porcelain cleats
- Plastic cleats
- Bakelite cleats
Function
- Hold wires in position
- Maintain spacing between conductors
- Provide electrical insulation
2. Insulated Wires
Wires carry electrical current.
Common types include:
- PVC insulated wires
- VIR (Vulcanized India Rubber) wires
Function
- Conduct electricity from source to load
3. Screws and Wall Plugs
These are used to fix cleats onto walls or ceilings.
Function
- Secure cleats firmly to the structure
4. Distribution Board
The distribution board controls power distribution.
Function
- Contains switches and protective devices
5. Switches and Sockets
These control electrical appliances.
Function
- Turn power on or off
- Provide connection points for devices
6. Cleat Wiring Advantages
Understanding cleat wiring advantages and disadvantages helps technicians decide when to use it.
Advantages
- Very low installation cost
- Simple and quick installation
- Easy to inspect and repair
- Ideal for temporary wiring
- Minimal materials required
- No wall cutting required
- Flexible system for quick modifications
Because of these benefits, cleat wiring is widely used in temporary electrical setups.
7. Cleat Wiring Disadvantages / Limitations
Although cleat wiring is simple, it has several limitations.
Disadvantages
- Not suitable for permanent wiring
- Poor appearance
- Wires are exposed to dust and moisture
- Risk of mechanical damage
- Limited load capacity
- Not safe for modern buildings
Due to these issues, cleat wiring is rarely used in modern residential installations.
8. Cleat Wiring Applications
Despite its limitations, there are several important cleat wiring applications.
1. Construction Sites
Temporary lighting and power supply during building construction.
2. Workshops
Temporary machine power connections.
3. Exhibitions and Events
Short-term lighting installations.
4. Testing Laboratories
Temporary experimental electrical setups.
5. Educational Training
Used in electrical training labs to teach wiring basics.
9. Comparison: Cleat Wiring vs Batten Wiring
Understanding the difference between cleat wiring and batten wiring helps students learn different wiring systems.
| Feature | Cleat Wiring | Batten Wiring |
|---|---|---|
| Installation | Very simple | Moderate |
| Cost | Very low | Medium |
| Durability | Temporary | Semi-permanent |
| Safety | Low | Better |
| Appearance | Poor | Better |
| Protection | Wires exposed | Wires fixed on wooden batten |
Cleat wiring is mainly used for temporary setups, while batten wiring is suitable for longer-term installations.
10. Selection Guide: When to Use Cleat Wiring
Choosing the right wiring system depends on several factors.
Use Cleat Wiring When:
- Installation is temporary
- Budget is very limited
- Quick installation is required
- Wiring must be easily removable
Do Not Use Cleat Wiring When:
- Wiring is permanent
- Appearance is important
- High safety standards are required
Beginner Tip
Electrical students should practice cleat wiring first because it helps them understand basic wiring layouts easily.
11. Common Problems & Solutions
Here are common problems faced in cleat wiring systems.
1. Loose Wires
Cause
- Cleat caps not tightened properly
Solution
- Tighten cleat caps securely
2. Wire Sagging
Cause
- Cleats spaced too far apart
Solution
- Install cleats at proper intervals
3. Wire Damage
Cause
- Mechanical contact or sharp edges
Solution
- Replace damaged wire immediately
4. Short Circuit
Cause
- Damaged insulation
Solution
- Inspect wires regularly and replace faulty sections
12. Future Trends in Electrical Wiring
Although cleat wiring is rarely used in modern houses, electrical wiring technology continues to evolve.
Modern Wiring Systems
Modern buildings prefer:
- Concealed wiring
- Conduit wiring
- Modular electrical systems
Smart Electrical Systems
Future homes will include:
- Smart switches
- Energy monitoring systems
- Automated lighting systems
Improved Safety Standards
New electrical codes require:
- Better insulation
- Protective earthing
- Advanced circuit breakers
These improvements make modern wiring systems safer and more efficient.
13. Conclusion
The Cleat Wiring System in Houses is one of the simplest and oldest electrical wiring methods. Although it is rarely used in permanent house installations today, it remains an important concept for electrical students, engineers, and technicians to understand.
In this article, we discussed the cleat wiring working principle, its main components, and different types of cleat wiring systems. We also explored cleat wiring advantages and disadvantages, applications, comparison with other wiring systems, and practical troubleshooting tips.
Cleat wiring is mainly used for temporary electrical installations because it is inexpensive, easy to install, and simple to maintain. However, its exposed wiring and limited safety make it unsuitable for modern permanent housing systems.
For beginners in electrical engineering, learning cleat wiring provides a strong foundation in understanding how electrical circuits are installed and supported physically.
By mastering basic wiring systems like cleat wiring, students can build the knowledge needed to work with advanced electrical installation methods in the future.