
Imagine a situation where a water pump in your home suddenly stops working. The power supply is normal, the switch is on, but the motor does not start. Many technicians immediately suspect a winding fault inside the motor. Before replacing the motor or sending it for rewinding, a simple test using a multimeter can help diagnose the problem.
Motor winding faults are one of the most common causes of motor failure in homes, workshops, and industries. Learning how to check motor winding with multimeter is an essential skill for electrical students, engineers, and technicians. It helps save time, reduce maintenance costs, and quickly identify whether the motor is repairable.
A multimeter is one of the most useful electrical tools. With proper knowledge, it can be used to check continuity, resistance, short circuits, and insulation problems inside motor windings.
In this article, you will learn the check motor winding with multimeter working principle, step-by-step testing methods, types of winding faults, troubleshooting techniques, and practical tips used by experienced electricians. By the end, you will confidently understand how to diagnose motor winding problems safely and accurately.
What Is Checking a Motor Winding with a Multimeter?
Checking a motor winding with a multimeter is the process of testing the electrical condition of a motor’s windings using a digital or analog multimeter. This test helps determine whether the winding is operating normally or has developed faults such as an open circuit, short circuit, or ground fault.
Motor windings are coils of insulated copper wire installed inside the stator of an electric motor. When electrical current flows through these windings, they create a rotating magnetic field that causes the motor’s rotor to turn. If the winding becomes damaged due to overheating, insulation failure, moisture, aging, or mechanical stress, the motor may fail to start, overheat, lose efficiency, or stop working completely.
A multimeter is one of the simplest and most effective tools for performing an initial motor inspection. It allows technicians, electricians, and students to quickly evaluate the condition of the windings before deciding whether additional testing or repairs are needed.
What Can You Check with a Multimeter?
Using a multimeter, you can perform several important motor winding tests, including:
- Measuring winding resistance
- Checking continuity of the windings
- Detecting open circuits
- Identifying possible short circuits
- Checking for ground faults between the winding and motor frame
- Comparing resistance values between multiple windings
- Performing basic motor troubleshooting
Although a multimeter cannot detect every internal fault, it is an excellent first-step diagnostic tool for routine maintenance and fault finding.
Why Is Motor Winding Testing Important?
Testing motor windings helps identify electrical problems before they become major failures. Early detection reduces repair costs, minimizes equipment downtime, and extends the motor’s service life.
Regular winding testing can help:
- Prevent unexpected motor breakdowns
- Improve equipment reliability
- Increase workplace safety
- Reduce maintenance expenses
- Verify motor condition before installation
- Confirm repairs after motor servicing
Practical Example
Imagine that the single-phase motor in a ceiling fan suddenly stops working. Before replacing the entire motor, an electrician uses a multimeter to measure the winding resistance.
If the multimeter shows:
- Normal resistance, the winding is likely healthy, and the problem may lie elsewhere, such as the capacitor or power supply.
- Infinite resistance (OL), the winding is open or broken.
- Very low resistance, the winding may have an internal short circuit.
This simple test helps identify the fault quickly and prevents unnecessary motor replacement, saving both time and money.
Motor Winding Working Principle Using a Multimeter
The working principle of checking a motor winding with a multimeter is based on measuring the electrical resistance and continuity of the motor coils. A multimeter sends a very small electrical current through the winding and measures how much the winding resists the flow of that current.
A healthy winding has a continuous electrical path and a normal resistance value. If the winding is damaged, the resistance reading changes, allowing technicians to identify common electrical faults.
Unlike advanced diagnostic equipment, a multimeter performs basic electrical testing that is quick, safe, and suitable for routine troubleshooting.
Step-by-Step Working Process
Step 1: Disconnect the Power Supply
Before performing any test, completely disconnect the motor from the electrical supply.
This is the most important safety step because measuring resistance on a live circuit can damage the multimeter and create a serious electrical hazard.
Step 2: Inspect the Motor
Before connecting the multimeter, perform a visual inspection.
Look for signs such as:
- Burn marks
- Damaged insulation
- Loose terminals
- Broken wires
- Moisture or dirt
- Overheating
A visual inspection often provides valuable clues about the motor’s condition.
Step 3: Set the Multimeter to Resistance Mode
Turn the multimeter selector to the Resistance (Ω) setting.
If your multimeter has an auto-ranging function, it will automatically select the correct measurement range. Otherwise, choose a suitable resistance range manually.
Step 4: Connect the Test Leads
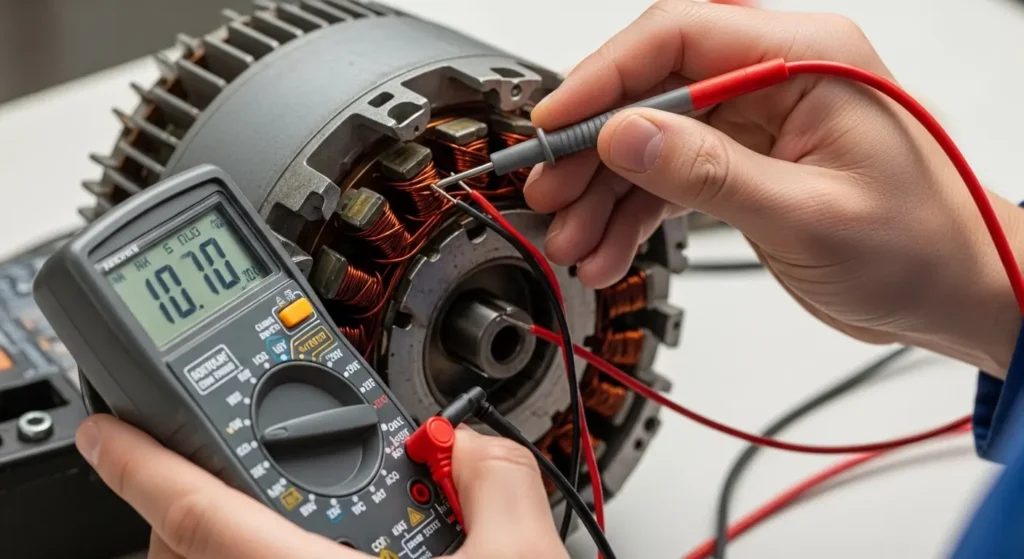
Place the multimeter probes on the motor winding terminals.
For a three-phase motor, measure the resistance between each pair of terminals.
Ensure the probes make good contact with clean terminals to obtain accurate readings.
Step 5: Measure the Winding Resistance
The multimeter sends a small electrical signal through the winding and displays the resistance value.
A healthy motor typically shows a low but measurable resistance, depending on its size and design.
For three-phase motors, all winding resistance values should be nearly equal.
Step 6: Analyze the Reading
Compare the displayed resistance with the expected values.
Possible results include:
- Normal resistance → Winding is likely healthy.
- Infinite resistance (OL) → Open or broken winding.
- Very low resistance → Possible short circuit.
- Unequal resistance between phases → Partial winding damage or loose internal connection.
Step 7: Perform a Ground Fault Test
To check for insulation failure:
- Place one probe on the motor frame.
- Place the other probe on a winding terminal.
A healthy motor should show no continuity between the winding and the motor body.
If continuity is detected, the insulation may be damaged, allowing current to leak to the motor frame.
Step 8: Record the Test Results
Document all resistance measurements and observations.
Keeping maintenance records helps technicians compare future readings and identify gradual winding deterioration before a major failure occurs.
Easy Analogy
Imagine the motor winding as a water pipe carrying water.
- Electricity is like the water flowing through the pipe.
- The winding is the pipe itself.
- The multimeter acts like a flow inspector checking whether the pipe is in good condition.
Now consider three possible situations:
- If the pipe is broken, water cannot flow. This is similar to an open circuit, where the multimeter displays OL (infinite resistance).
- If the pipe becomes blocked or damaged, the flow is affected, similar to abnormal resistance caused by a damaged winding.
- If two pipes accidentally connect together, water flows in the wrong direction. This is like a short circuit, where the multimeter shows unusually low resistance.
In simple terms, the multimeter checks how easily electricity flows through the motor winding. By measuring resistance and continuity, it helps determine whether the winding is healthy or whether a fault has developed that requires repair or further testing.
Types of Motor Winding Tests Using a Multimeter
Motor winding tests using a multimeter can be classified into different types based on the electrical fault being checked. Each test helps identify a specific problem, allowing technicians to diagnose motor conditions quickly and accurately.
1. Continuity Test
The continuity test is the simplest and most commonly performed motor winding test. It checks whether the electrical path through the winding is complete.
When the multimeter is set to continuity mode, it sends a small electrical signal through the winding.
- If the multimeter beeps or displays a resistance value, the winding has continuity and the electrical path is complete.
- If the display shows OL (Open Loop) or no reading, the winding may be broken or disconnected internally.
Purpose
- Detect open windings
- Check broken connections
- Verify complete electrical circuits
Common Applications
- Ceiling fans
- Water pumps
- Washing machines
- Three-phase motors
- Industrial motors
2. Resistance Test
The resistance test measures the electrical resistance of the motor winding using the multimeter’s ohms (Ω) function.
Healthy windings usually have a low but measurable resistance. The exact value depends on the motor’s size, power rating, and winding design.
For three-phase motors, the resistance between all winding pairs should be nearly equal.
Purpose
- Measure winding resistance
- Compare phase resistance
- Detect damaged windings
- Identify open or partially damaged coils
Signs of a Fault
- Infinite resistance indicates an open winding.
- Extremely low resistance may indicate a short circuit.
- Unequal resistance between phases suggests winding damage or loose internal connections.
3. Ground Fault Test
The ground fault test checks whether the motor winding has accidentally come into contact with the motor frame or casing.
To perform this test:
- Place one multimeter probe on the motor body.
- Place the other probe on a winding terminal.
A healthy motor should show no continuity between the winding and the motor frame.
Purpose
- Detect insulation failure
- Identify leakage current paths
- Check for winding-to-frame faults
- Improve electrical safety
Possible Causes of Ground Faults
- Damaged insulation
- Moisture inside the motor
- Overheating
- Dirt or conductive contamination
4. Short Circuit Test
A short circuit test helps identify internal short circuits between winding turns or conductors.
Although a multimeter cannot detect every turn-to-turn fault, it can indicate serious short circuits through unusually low resistance readings.
Purpose
- Detect shorted windings
- Identify internal electrical faults
- Evaluate winding condition
Signs of a Fault
- Resistance close to 0 Ω
- Unequal phase resistance
- Motor overheating during operation
- Frequent circuit breaker tripping
For detailed short-circuit analysis, specialized motor analyzers may be required.
Summary of Motor Winding Tests
| Test Type | Purpose | Healthy Result | Fault Indication |
|---|---|---|---|
| Continuity Test | Checks electrical path | Beep or measurable resistance | OL or no continuity |
| Resistance Test | Measures winding resistance | Low, balanced resistance | Infinite, very low, or unequal resistance |
| Ground Fault Test | Checks insulation to motor frame | No continuity | Continuity with motor body |
| Short Circuit Test | Detects shorted windings | Normal resistance | Extremely low resistance |
Main Components Used for Motor Winding Testing
Several tools and motor components are involved when checking a motor winding with a multimeter. Understanding their functions helps technicians perform accurate and safe testing.
1. Digital Multimeter
The digital multimeter is the primary instrument used for motor winding testing. It measures resistance, continuity, voltage, and other electrical parameters.
Functions
- Measures winding resistance
- Performs continuity tests
- Detects open circuits
- Identifies possible short circuits
- Supports basic motor troubleshooting
2. Motor Terminals
Motor terminals are the connection points where the winding wires are accessible.
These terminals allow technicians to connect the multimeter probes and measure the electrical condition of the windings.
Functions
- Provide access to winding connections
- Allow resistance measurement
- Enable continuity testing
- Simplify maintenance and repairs
3. Stator Windings
The stator winding is the stationary electrical winding inside the motor.
When energized, it produces the magnetic field that causes the rotor to rotate.
Testing the stator winding helps determine whether the motor is electrically healthy.
Functions
- Produce the rotating magnetic field
- Convert electrical energy into magnetic energy
- Drive motor operation
- Deliver electrical performance
4. Winding Insulation
Every winding is covered with electrical insulation that prevents adjacent conductors from touching each other or the motor frame.
Good insulation is essential for safe and reliable motor operation.
Functions
- Prevent short circuits
- Prevent ground faults
- Improve electrical safety
- Protect the winding from moisture and contamination
5. Motor Frame
The motor frame is the outer metal housing that protects the internal components.
It also serves as the reference point during a ground fault test.
Functions
- Protect internal components
- Support the motor structure
- Dissipate heat
- Provide grounding protection
6. Test Probes
Multimeter test probes connect the meter to the motor terminals.
High-quality probes ensure accurate measurements and safe operation.
Functions
- Carry test signals
- Connect the multimeter to the motor
- Improve measurement accuracy
Advantages of Checking Motor Winding with a Multimeter
Checking a motor winding with a multimeter offers many practical benefits for electricians, technicians, maintenance engineers, and students.
Key Advantages
- Quick and simple testing procedure
- Requires only a basic digital multimeter
- Helps detect winding faults at an early stage
- Reduces unnecessary repair and replacement costs
- Suitable for both beginners and experienced technicians
- Ideal for preventive maintenance programs
- Portable and convenient for field service work
- Provides fast troubleshooting results
- Improves equipment reliability
- Saves maintenance time
- Cost-effective compared to advanced diagnostic equipment
- Easy to learn and perform with minimal training
Real-World Benefits
Regular multimeter testing helps identify motor problems before they become major failures. This reduces equipment downtime, improves workplace safety, and extends the service life of electric motors in residential, commercial, and industrial applications.
Disadvantages and Limitations of Motor Winding Testing with a Multimeter
Although a multimeter is one of the most useful tools for basic motor testing, it has certain limitations. It should be viewed as a first-level diagnostic tool rather than a complete motor health analyzer.
Common Limitations
- Cannot detect every internal winding fault
- Does not accurately measure insulation resistance
- Limited ability to identify turn-to-turn short circuits
- Cannot evaluate winding condition under operating load
- Requires basic electrical knowledge for correct interpretation
- May produce misleading readings if connections are loose or terminals are dirty
- Less effective for diagnosing complex industrial motors
- Cannot assess overall motor efficiency or performance
When Additional Testing Is Needed
If multimeter readings suggest a serious problem or if the motor continues to malfunction, technicians often perform additional tests using specialized equipment such as:
- Insulation Resistance Tester (Megger)
- Motor Winding Analyzer
- Surge Tester
- Earth Resistance Tester
- Thermal Imaging Camera
- Vibration Analyzer
Combining multimeter testing with these advanced diagnostic tools provides a more complete assessment of the motor’s electrical and mechanical condition, helping ensure accurate fault diagnosis and reliable maintenance decisions.
Applications of Checking Motor Winding with a Multimeter
The applications of checking motor winding with a multimeter are extensive in electrical maintenance, troubleshooting, and repair. A multimeter allows electricians and technicians to quickly identify common motor faults without using complex testing equipment. Because it is affordable, portable, and easy to use, it remains one of the most essential diagnostic tools in both residential and industrial environments.
Home Appliance Applications
Many household appliances use single-phase electric motors that can be tested with a multimeter.
Common examples include:
- Ceiling fans
- Washing machines
- Water pumps
- Air coolers
- Exhaust fans
- Refrigerator compressors
- Vacuum cleaners
- Mixer grinders
Using a multimeter helps determine whether the motor winding is healthy or has developed an open circuit, short circuit, or insulation problem.
Industrial Applications
Three-phase motors are widely used in industries, and multimeter testing is often the first step in diagnosing electrical faults.
Common industrial equipment includes:
- Conveyor motors
- Compressor motors
- Industrial pumps
- Machine tool motors
- HVAC motors
- Blowers and ventilation systems
- Cooling tower motors
- Packaging machines
Routine winding checks help minimize downtime and improve equipment reliability.
Electrical Maintenance
Electricians and maintenance engineers regularly use multimeters during preventive and corrective maintenance.
Typical maintenance tasks include:
- Preventive maintenance inspections
- Motor troubleshooting
- Repair verification
- Workshop diagnostics
- Installation testing
- Routine electrical inspections
- Quality control checks
Regular motor testing helps detect faults before they become serious failures.
Educational and Training Purposes
Multimeters are also widely used in:
- Electrical engineering laboratories
- Technical training institutes
- Vocational education centers
- Industrial training programs
Students learn the fundamentals of motor winding testing by measuring resistance, continuity, and basic electrical parameters.
Why a Multimeter Is Commonly Used
Technicians prefer multimeters because they are:
- Easy to operate
- Portable and lightweight
- Cost-effective
- Suitable for quick fault detection
- Reliable for routine maintenance
- Available in both digital and analog models
Although advanced diagnostic instruments provide more detailed analysis, the multimeter remains the first tool used for basic motor winding inspection.
Comparison: Multimeter Test vs. Megger Test
Both a multimeter and a megger (insulation resistance tester) are important diagnostic tools, but they serve different purposes. Understanding the difference between a multimeter test and a megger test helps technicians choose the correct instrument for motor testing.
| Feature | Multimeter Test | Megger Test |
|---|---|---|
| Primary Purpose | Checks continuity and winding resistance | Measures insulation resistance |
| Test Voltage | Very low test voltage | High DC test voltage (typically 250V–1000V or higher) |
| Main Faults Detected | Open circuits, short circuits, continuity faults | Insulation leakage, moisture, ground faults |
| Accuracy | Suitable for basic electrical testing | More accurate for insulation condition |
| Safety | Safe for routine measurements | Requires proper safety precautions |
| Equipment Cost | Low | Higher |
| Ease of Use | Easy for beginners | Requires basic technical knowledge |
| Typical Applications | Daily troubleshooting and maintenance | Preventive maintenance and insulation testing |
| Motor Testing | Basic winding checks | Complete insulation health assessment |
When Should You Use a Multimeter?
A multimeter is the best choice when you need to:
- Check winding continuity
- Measure winding resistance
- Identify open circuits
- Detect basic short circuits
- Perform routine troubleshooting
When Should You Use a Megger?
A megger is recommended when you need to:
- Test insulation resistance
- Detect moisture inside windings
- Check leakage current paths
- Evaluate insulation quality before commissioning
- Perform preventive maintenance on large motors
Which Tool Is Better?
Neither tool replaces the other.
- A multimeter is ideal for quick and basic electrical testing.
- A megger is essential for evaluating insulation health.
Professional electricians often use both tools together to obtain a complete assessment of a motor’s condition.
Selection Guide: How to Choose the Right Multimeter for Motor Winding Testing
Selecting the right multimeter is important for obtaining accurate and reliable test results. A quality multimeter not only improves measurement accuracy but also enhances user safety during electrical testing.
1. Choose a Digital Display
Digital multimeters provide:
- Clear readings
- Better accuracy
- Easy operation
- Faster measurements
For beginners, a digital multimeter is usually the best option.
2. Check the Resistance Measurement Range
Motor windings often have very low resistance values.
Choose a multimeter that can accurately measure:
- Low resistance
- High resistance
- Auto-ranging values (if available)
3. Continuity Buzzer
A built-in continuity buzzer allows technicians to quickly determine whether a winding has electrical continuity without constantly watching the display.
4. Safety Rating
Always choose a multimeter that meets recognized electrical safety standards.
Look for features such as:
- CAT III or CAT IV safety rating
- Fuse protection
- Overload protection
- Durable insulated probes
These features improve operator safety during testing.
5. Auto-Ranging Function
Auto-ranging multimeters automatically select the correct measurement range.
Benefits include:
- Faster testing
- Reduced measurement errors
- Easier operation for beginners
6. Build Quality
A well-built multimeter provides:
- Longer service life
- Better resistance to accidental drops
- Reliable performance in industrial environments
7. Trusted Brand
Selecting a reliable manufacturer often ensures:
- Better accuracy
- Longer warranty
- Higher durability
- Better customer support
Tips for Beginners
If you are new to motor winding testing, follow these simple safety and accuracy tips:
- Always disconnect the power supply before testing.
- Verify that the motor is completely de-energized.
- Label motor terminals before disconnecting wires.
- Set the multimeter to the correct resistance or continuity mode.
- Compare resistance readings between all windings.
- Inspect the motor visually for signs of overheating or damaged insulation.
- Use insulated gloves and appropriate personal protective equipment (PPE).
- Never perform resistance tests on a live electrical circuit.
- Record the measured values for future maintenance comparisons.
Following these best practices improves testing accuracy, enhances safety, and helps detect motor winding problems before they cause major equipment failures.
Common Multimeter Testing Problems and Troubleshooting Solutions
When testing a motor winding with a multimeter, you may encounter readings that indicate potential faults. Understanding these readings helps you identify problems quickly and decide whether the motor can be repaired or needs further inspection.
Why Does the Motor Show Infinite Resistance?
If the multimeter displays OL (Open Loop) or infinite resistance between the winding terminals, it usually means the electrical circuit is open.
Possible Causes
- Broken winding inside the motor
- Loose or disconnected internal wire
- Burned winding due to overheating
- Faulty terminal connection
Solution
- Inspect the motor terminals and wiring.
- Check for loose connections.
- If the winding is open internally, rewinding or replacing the motor may be necessary.
Why Does the Multimeter Show Very Low Resistance?
A very low resistance reading is normal for some high-power motors. However, if the resistance is almost 0 Ω, it may indicate a short circuit.
Possible Causes
- Short-circuited winding
- Damaged insulation between coil turns
- Moisture inside the winding
- Burned insulation due to excessive heat
Solution
- Compare the reading with the manufacturer’s specifications.
- Perform an insulation resistance test using a megger if available.
- Repair or rewind the motor if a short circuit is confirmed.
Why Does the Motor Body Show Continuity with the Winding?
When one multimeter probe is placed on the motor frame and the other on a winding terminal, there should normally be no continuity.
If continuity is present, the winding is leaking current to the motor body.
Possible Causes
- Damaged winding insulation
- Moisture contamination
- Dirt or conductive particles inside the motor
- Insulation breakdown due to aging
Solution
- Dry and clean the motor thoroughly.
- Test insulation resistance before restarting.
- Replace or rewind the winding if insulation damage is severe.
Why Do Windings Show Unequal Resistance?
In a healthy three-phase motor, the resistance between each pair of windings should be nearly equal.
Significant differences indicate an internal problem.
Possible Causes
- Partial winding damage
- Overheating
- Loose internal connections
- Corroded terminals
- Manufacturing defects
- Uneven coil deterioration
Solution
- Tighten all electrical connections.
- Compare all winding resistance values.
- Perform additional insulation tests.
- Have the motor inspected by a qualified technician if the readings remain uneven.
Why Does the Multimeter Show No Continuity?
If there is no continuity between the winding terminals, the electrical path is broken.
Possible Causes
- Open winding
- Broken conductor
- Faulty terminal
- Internal wire disconnection
Solution
- Check terminal connections.
- Inspect the winding for damage.
- Repair or rewind the motor if necessary.
Why Are the Resistance Readings Fluctuating?
Unstable or constantly changing readings usually indicate poor electrical contact rather than a winding fault.
Possible Causes
- Loose test probes
- Dirty terminals
- Oxidized connectors
- Weak multimeter battery
Solution
- Clean the terminals.
- Ensure firm probe contact.
- Replace the multimeter battery if needed.
- Repeat the measurement for accurate results.
Quick Troubleshooting Table
| Multimeter Reading | Possible Problem | Recommended Action |
|---|---|---|
| Infinite Resistance (OL) | Open winding | Inspect wiring or rewind the motor |
| Very Low Resistance | Short circuit | Perform further insulation testing |
| Continuity Between Winding and Frame | Ground fault | Repair insulation or rewind the motor |
| Unequal Winding Resistance | Partial winding damage | Inspect and test all windings |
| No Continuity | Broken winding | Repair or replace the winding |
| Fluctuating Readings | Poor electrical contact | Clean terminals and repeat the test |
Future Trends in Motor Winding Testing
Motor testing technology continues to evolve as industries focus on improving reliability, reducing downtime, and lowering maintenance costs. While a digital multimeter remains one of the most important diagnostic tools, modern technologies provide deeper insights into motor health and help detect problems before they lead to failure.
Smart Motor Analyzers
Modern motor analyzers can evaluate the condition of motor windings in real time.
Features
- Automatic winding analysis
- Resistance comparison
- Phase balance testing
- Instant fault detection
- Digital reporting
These instruments help technicians diagnose faults more quickly and accurately.
Predictive Maintenance Systems
Many industries now use predictive maintenance instead of waiting for equipment to fail.
Smart sensors continuously monitor:
- Motor temperature
- Vibration levels
- Current consumption
- Voltage
- Insulation condition
- Bearing health
The collected data helps maintenance teams identify potential issues before a breakdown occurs.
Digital Diagnostic Tools
Modern testing devices combine multiple functions into a single instrument.
These tools can perform:
- Resistance measurement
- Continuity testing
- Insulation resistance testing
- Capacitance measurement
- Frequency analysis
- Motor health assessment
This reduces testing time and improves troubleshooting accuracy.
IoT-Based Motor Monitoring
Industrial facilities are increasingly adopting Internet of Things (IoT) technology to monitor motors remotely.
Benefits include:
- Real-time performance monitoring
- Remote fault alerts
- Automatic maintenance scheduling
- Reduced unexpected downtime
- Improved equipment reliability
Artificial Intelligence in Motor Diagnostics
Artificial Intelligence (AI) is becoming an important part of motor maintenance.
AI-powered systems can:
- Detect abnormal operating patterns
- Predict winding failures
- Recommend maintenance actions
- Reduce repair costs
- Improve motor lifespan
Portable Wireless Testing Equipment
Modern portable testers allow technicians to perform advanced motor diagnostics directly in the field.
Advantages include:
- Wireless connectivity
- Faster testing
- Cloud-based data storage
- Easy report generation
- Improved maintenance efficiency
The Continuing Importance of the Multimeter
Although advanced diagnostic technologies are becoming more common, the digital multimeter remains an essential tool for electricians, technicians, and engineers. It is affordable, easy to use, highly reliable, and ideal for quickly checking continuity, resistance, voltage, and basic motor winding conditions during routine inspections and field troubleshooting. For most day-to-day maintenance tasks, a multimeter continues to be the first and most valuable testing instrument.
13. Conclusion
Learning how to check motor winding with multimeter is a valuable skill for anyone working with electric motors. It provides a quick and reliable method to identify common winding faults such as open circuits, short circuits, and ground faults.
In this guide, we explored the check motor winding with multimeter working principle, testing methods, classifications, advantages and disadvantages, and practical troubleshooting steps. These techniques are widely used in homes, workshops, and industries to diagnose motor problems efficiently.
For electrical students and technicians, mastering this simple testing method builds a strong foundation in motor maintenance. While advanced diagnostic tools exist, the multimeter remains one of the most practical and accessible instruments in electrical engineering.
With regular practice and careful safety precautions, you can confidently inspect motor windings and prevent costly equipment failures.